Detail Instructions for Grades & Comments - Upper School
(4/00)
(April
2000 : Upper School : covers Marking Period 3)
IMPORTANT
NOTES:
You do not
need to log-on to the Novell Network to run the eClass Grades or
Comments program. However, after grades and comments are entered on your
computer, you must log-on to turn them in. You should
complete BOTH
grades and comments before using the Turn in MP3 Grades & Comments
icon
in the Upper School Folder of the faculty drive.
Comments
are required for any students with grades of C- or below.
Make sure
that all student names and student numbers match the names and numbers
listed on your class rosters, as generated by the Registrar. Incorrect
names or numbers have been among the most common errors in submitting grading
information.
For
those who feel comfortable with doing grades and comments, I've included
an Overview
section to summarize the procedure for this round of grades.
No
matter what you do, make sure that you use the Wilson99.usr file for comments
if you are going to take advantage of the automated submission process!
If you don't use Wilson99.usr, talk with Bruce Adams about how to properly
turn in your comments.
Overview
The
procedure for both grades and comments is essentially unchanged from prior
periods. For grades, you need to start e-Class, input marking period 3
grades for all students in each section, and then export the MP3 term marks.
For comments, you will need to start the Comments program, open the Wilson99.usr
file, and write a comment for each student with a grade of C- or less.
When doing comments, make sure that the Reason for Comment is changed to
MP3 only for those students on whom you are writing comments. After you've
completed input of both Grades and Comments, you can use the Turn
In MP3 Grades & Comments icon in the Upper School Folder of the
Faculty Drive. It must be stressed that this method of turning in the comments
only works if you did your comments using the Wilson99.usr file.
Starting
the E-class Grades program
1.
Double-click on the GRADES icon on your desktop (or go to Start
| Programs | eClass | Grades)
Inputting
grades for a section
These
procedures should be followed with each of the sections for which you will
be inputting grades.
1. Once
the program starts, click on the Open
Class
icon (or go to File
| Open Class).
2. Select
a file for one of your sections and click ok.
A list of students in the section should now appear in the Students window.
(There will also be an Assignments window. You should ignore or minimize
both the Students and the Assignments windows. Make no changes in either
window unless you need to add a student to the Students window. If you
do need to add a student, confer with Maria Haering and make sure that
you use the correct student name and student number.)
3. Click
on the A+
Scores
icon on the top toolbar. A new window, with another list of all the students
in the section, will appear, along with columns for grades. Use this is
the window to enter grades.
*
* * Please note that you may not be able to see all of the students initially.
You may need to scroll or adjust the size of the Scores window to see all
of the students in the section. * * *
4. Enter
a letter grade (A+, A, A-, B+, B, B-, C+, C, C-, or F) in the Marking
Period 3 column. Use the enter key or the arrows to go from cell to
cell. (Even
though you will be entering letter grades, a percentage will show up in
the marking period and grade columns. In order to maintain consistency
and integrity in the system, you should enter letter grades, anyway. However,
you may want to maintain records of any numerical scoring that you use
throughout the semester if it will make it easier to generate your semester
and final grades.)
Saving
Grades for a section
You
do not need to save until you have completed all grades for a section and
are ready to turn in the grades. However,
this set of procedures must be done for each individual section after you
have input the grades and before you turn in the grades on the network.
If you make changes to grades after completing this process, you will need
to repeat it. Please relax, read carefully, and take your time with this
set of steps. Haste can make waste. Please contact your friendly neighborhood
Technology Coordinator before you even think of getting frustrated!
-
After entering a grade for each student in a section, select:
File
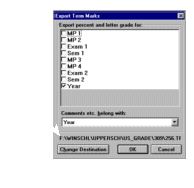
| Export Term Marks
This will
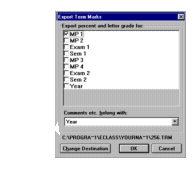
put you in the Export Term Marks dialog box, where you should:
a.
check-off the MP3
box,
b. uncheck
other selections, such as Year,
etc.., and
c. click
OK (You
do not need to change or select any settings in the Comments
etc. belong with:
area.)
-
The Change Destination button should
say C:\PROGRA~1\ECLASS\YOURNA~1\...,
as shown above, whereYOURNA~1
represents the first few letters of your last name (e.g.:
If your name is longer than eight characters, like VANINWAGEN, it will
be displayed as VANINW~1).
If
your nameis correctly
displayed in this way, skip to step
4. (I suspect that most faculty will be in this situation as a result
of the marking period 1 process.)
If your
nameis
not correctly
displayed in this way, continue on to step
3a.
-

 Click:
Change
Destination
 At
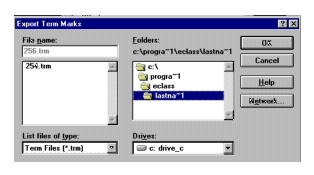
this point, the Folders window in most of the laptops will already show
the first three of the four folders to be identified as your destination
(see image at right),
c:\
| progra~1 | eclass
If so, skip to step
f to add the fourth folder, which is based on your name. If
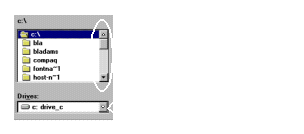
these three folders noted do not appear, use the Drive Selection button
(see image below right) to change the drive to C: (if necessary).
 In
folders, double click on C:\
(if necessary)
In folders,
double click on progra~1
(you may need to use the scroll bar to find it)
In folders,
double click on eclass
(use the scroll bar if necessary)
In folders,
double click on yourna~1
*(e.g.: If your name is VANINWAGEN, it will be displayed as VANINW~1)
Click OK
In
folders, double click on C:\
(if necessary)
In folders,
double click on progra~1
(you may need to use the scroll bar to find it)
In folders,
double click on eclass
(use the scroll bar if necessary)
In folders,
double click on yourna~1
*(e.g.: If your name is VANINWAGEN, it will be displayed as VANINW~1)
Click OK
4 From the
menu, select: File
| Save Class
5 After
saving, you need to close the roster file by selecting: File
| Close Class.
Exiting
the E-class Grades program
1.
Click the x
icon in the upper right corner of the eClass window (or go to the menu
and select File
| Exit). [If
you do not regularly use the x
icon, it is a quick and easy way to close any window in Win95 or Win98.]
Starting
the Comments Program
1. Double-click
on the U.S.
Comments icon (Some computers still say Comments
98-99).
2. You
will see a prompt which says: "WILSON98.USR"
could not be found and is required to complete this operation. To acknowledge
this dialog, click: OK.
3. An
Open File dialog box will appear. Find and highlight wilson99.usr.
Then click Open
to open the file.
4. Enter
the password for the Comments database. (See me or another faculty member
if you forgot it.)
Identifying
Your Students
1. When
the program starts, you must call up all the student records for your courses
by:
-
selecting
the FIND
command [find button on the top left of your screen]
-
typing your
name in the TEACHER
NAME field (You only need to type in the first few letters of your name
to call up your records; for example, you can type alf
for Alford, Stewart.)
-
Select the SORT
command and choose the Sort
button in the Sort Records dialog box. Do not make any changes to the order
of the fields to be sorted.
Setting
the Reason for Comment (to MP 3)
(Because
you are only doing comments for selected students, you should change the
Reason for Comment manually and for only those students for whom you are
doing comments.)
-
Move
to the student for whom you are writing a comment and click on the REASON
FOR COMMENT field.
-
Choose MP3
from the drop down list.
Entering
Comments
-
To enter your comments, type the text of your comment in the
COMMENTS
field. (CAUTION:
Do not type beyond the given space for comments. The database program will
let you type beyond the given space, but it will not print your comments
if you exceed the given space in the COMMENTS
field.)
Repeat step
1 for all students with a C- or less. Notice that you can flip through
the file using the rolodex icon on the top left of the screen.
Your
comments are automatically saved as you move from one student record to
another. When you quit, the file will be automatically saved as well.
Sorting
the Comments before you turn them in
Before
initiating the turn-in procedure for Grades and Comments, make sure your
coments are sorted.
-
select the
FIND
command,
type your
name in the TEACHER
NAME field, and
press the
Enter Key. (This is basically repeating step 1 under Identifying your Students.)
Then, Quit
the comments program. (Yes, Quit the program.)
Correcting
Possible Errors in the Database
Most
database errors should have been fixed in prior marking periods, but here
are instructions for fixing those which may still remain. These computer
programs are actually pretty dumb, so make sure you spell student names,
class names, and your name exactly as they appear on the class rosters
you receive from the Registrar. If the names are spelled differently or
abbreviated, the information for student grades may not be transferred
properly.
Here
are the most common errors and how you can deal with them.
-
A
student's name may be listed in the wrong section or in the wrong class.
You can change the student's information by typing in the correct information
in the appropriate fields. If the error in the student record is a mistake
in the SECTION, FORM or CLASS NAME field(s), then enter the correct information. You
should not delete records with these errors
(unless it is a duplicate record); see # 3 below.
A student
is not listed in one of your classes. To create a new student's information,
you can create a new record in two ways (Use A or B, but not both. Option
A is preferable):
-
To minimize
any errors you may inadvertently make when creating a new student record,
use the Mode…Duplicate Record command to create a new record. Call up a
record for a student within the same section and select the Mode…Duplicate
Record command to retain all of the information from that section. You
will then only need to enter the new student's name and, of course, the
comment.
-
Select NEW
RECORD and fill in the information for each field. Be sure to spell the
exact name of the course as it appears in all the other records.
There is
a duplicate student record or There is a student who is listed in one of
your sections, but is not in any of your classes. You should delete such
student records. To delete a student record, select the Mode…Delete Record
command.
Checklist
for Turning in Grades and Comments
If
the answer to all of the questions below is yes, they you are ready to
turn in your grades and comments.
-
Did I fill
in the MP3 grades for all of my students?
-
Did I verify
the proper spelling of student names and class names for missing records
that I added to the database? Did I fill in the correct student number
in each of these cases?
-
Did I export
term marks individually for each one of my sections?
-
Did I write
a comment for each student with a C- or below?
-
Did I make
sure that my comments fit within the space provided?
-
Did I set
the Reason for Comment to Marking Period 3 for each student on whom I wrote
a comment and only those students?
-
Did I re-sort
the comment file after completing the comments.
Turning
in your Grades and Comments
NOTE:
You must be directly logged on to the Haverford Network to turn in your
grades and comments.
To make best use of everyone's time and effort, do this step AFTER you've
finished both grades and comments for all of your sections. If you did
not Export Term Marks for each of your sections, your grades will not be
turned in properly.
-
If you are
not logged on the network, attach your computer to the network, restart
it, and log on.
-
Double Click: My
Computer (This Computer, on some of the laptops)
-
Double Click: Drive
S (which will show up on your screen as FACULTY on HAVERFORD\VOL...)
-
Double Click: Turn
In MP3 Grades & Comments. (This is a long name, so some of you may
not see much more than Turn
in MP3 Gr.... It will vary from laptop to laptop.)
-
Wait until
you see this:
The
process for copying grades and comments is complete. You may now close
this window.
Press and
hold the Alt key while you make one quick tap on the F4 key. Then release
the Alt key. This should close the window. If the window doesn't close,
repeat this step again.
Now you
can focus on imparting the final two months of wisdom for 1999-2000. (Next
marks are due June 12, 2000).


 At
this point, the Folders window in most of the laptops will already show
the first three of the four folders to be identified as your destination
(see image at right),
 In
folders, double click on